


Additional information
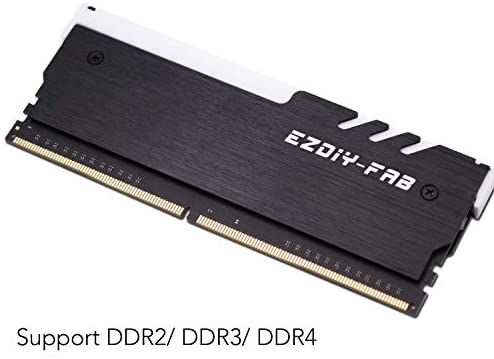
| RAM | ddr3_sdram |
|---|---|
| Brand | EZDIY-FAB |
| Item model number | US-DDR-3528-B-2P with C |
| Item Weight | 7.4 ounces |
| Package Dimensions | 6.81 x 5.24 x 0.98 inches |
| Computer Memory Type | DDR4 SDRAM |
| Voltage | 5 Volts |
| Manufacturer | EZDIY-FAB |
| ASIN | B07DVFM4TJ |
| Is Discontinued By Manufacturer | No |
| Date First Available | July 28, 2018 |
| Customer Reviews | /** Fix for UDP-1061. Average customer reviews has a small extra line on hover* https://omni-grok.amazon.com/xref/src/appgroup/websiteTemplates/retail/SoftlinesDetailPageAssets/udp-intl-lock/src/legacy.css?indexName=WebsiteTemplates#40*/.noUnderline a:hover {text-decoration: none;}4.4 out of 5 stars145 ratingsP.when('A', 'ready').execute(function(A) {A.declarative('acrLink-click-metrics', 'click', { "allowLinkDefault" : true }, function(event){if(window.ue) {ue.count("acrLinkClickCount", (ue.count("acrLinkClickCount"), 0) + 1);}});});P.when('A', 'cf').execute(function(A) {A.declarative('acrStarsLink-click-metrics', 'click', { "allowLinkDefault" : true }, function(event){if(window.ue) {ue.count("acrStarsLinkWithPopoverClickCount", (ue.count("acrStarsLinkWithPopoverClickCount"), 0) + 1);}});});4.4 out of 5 stars |
| Best Sellers Rank | #1,389 in Internal Fans & Cooling Components |

BC –
The 5V version that comes with the Gigabyte adaptor works with the Corsair Lighting Node Pro!Using the adaptor to plug into the LED 1 or 2 port on the Node Pro you get full Corsair lighting control! (Thank you connector standardization.) It works best when it thinks it’s an RGB strip.I confirmed that it worked and then swapped in a professional connector made by Pirate Dog Tech (eBay) which has an actual Corsair compatible connector. It has the alignment tabs and snap in tab to prevent slip out.
Cole J –
Your browser does not support HTML5 video. Both sticks come with full length wires that both have a splitter on it, so you have a lot of extra wire. Also, You may have to remove heatshield off of old ram sticks. I didnt think of that when I orded these. Honestly if I did, I probably wouldnt have ordered them. But it looks great.
Masami Y. –
These are just perfect. I was thinking about buying some new ram that has RGB on the stock heat sink, but I came across this mod by EZDIY, and I am so glad I chose these instead. It is such a good way to add RGB onto your PC in a very inexpensive way. I use these heat sinks on my HyperX Predator ram sticks, and it comes with foam pads and heat spreaders and a screwdriver so you are all set. Great product!
Apinrut –
So yeah I really love these. I’m not a tinkerer by any stretch and was super nervous about installing these. Taking the heat spreaders off my rams was probably the most nerve wrecking, but it’s actually super easy with a blow dryer.I didn’t have the LED headers on my board, so I need to get the one with the controller. You pretty much just need one controller as you can just daisychain them all together. Might have been a given but I didn’t know that. I’m not a tinkerer.The instruction given is pretty useless but you can look up some useful videos on YouTube. Found out I needed molex to SATA adapter for my modular PSU so that would have been great to know. But i ordered one and it all worked out. These lights are super legit!Now I can happily wait to upgrade my mobo and rams (led) when the new 7/10nm chips arrive.
agig –
I have Corsair RGB fan and Thermaltake RGB CPU cooler. But there is no RGB memory that I could find anywhere so I could finish my build. So I bought this kit and upgrade my Corsair 16 gigabyte memory with RGB Bling. I am so happy with the results.
Martin A. –
EASY to install. Tool about 30 seconds total. The included controller is nice. Can be hooked up to a mobile or use the rf remote.
Jonah mann –
Your browser does not support HTML5 video. Looks as good as trident z but cost so much less. These are addressable so you get really awesome effects.I converted Corsair vengeance white led ddr4 using a hairdryer to remove the original heatsinks. [very easy] I applied the included thermal pad on the memory modules and connected RGB heat spreaders plugged everything in and watched in amazement!!!!Update: they still work amazing!!!! I see some user had issues. Mine have been working perfectly fine and I totally recommend buying these.
N355 –
Very impress with these RGB Ram cooler. Replaced my old ddr3 gskill trident. To me it was very straight forward, no intructuon was needed but there is instructions if you do need them. Worked right away in a Deepcool Matrexx 50 with its onboard RGB controller. I didn’t use the remote to control the color.
Eric Hochuli –
Installation was easy, the wires were no trouble to hide. The remote comes with A LOT of pre programmed colors and animations so if you don’t have a new MOBO with rgb control you will still be able to find something that works for your color scheme. I am so psyched to be able to have rgb ram without buying an extremely expensive memory kit.
Cat –
NOTE: These are my personal experiences and I don’t condone doing exactly what I did here to remove the RAM. If you are not confident in removing the shields either buy naked RAM or just don’t get it.When I first saw this product online I was honestly skeptical of how well it will look when I have the product in hand. My mind immediately changed once I got the product and I had finished the installation (I’ll go through the installation later). The heatsink, once installed, looked natural as if it was the G. Skill RGB RAM. The lighting is bright enough to light up your rig and I do recommend it that you dim your light strips down to emphasize these RGB kits. The kit I bought has a remote with settings for speed, pre-set illumination, and brightness. Like a typical standard RGB remote it also has the 12 static colors to chose from. Changing the lighting is as simple as pointing the remote, granted you have removed the battery blocker. If you don’t want the lights for some reason you can also turn them off.TL,DR: YOU ARE RESPONSIBLE FOR YOUR OWN MISTAKES. Use heatgun to weaken adhesive if you have RAM shields and pry with a tool you are comfortable with. Once done, test fit RAM to see where the memory sits so you can correctly place the thermal pads and then rinse and repeat for the other side/the rest of your kit.Installing these are a bit tricky. Mind you that YOU ARE RESPONSIBLE for your own mistakes when installing these. Docking it down a few stars because you yourself took the brutish way of installation does not make it the manufacturer’s fault. In my case of installation I referred to YT vids on my specific RAM, which were Corsair Vengeance DDR3s. Use a heatgun and set it to high and have it about 6″ away from the RAM and just slowly sweep side to side for about 10 sec. To remove the metal shielding, in my case I just used a thin flat head screw driver, and slowly lift the shield off while applying only the right amount of pressure where you can hear the adhesive come off. I DO NOT recommend using a screw driver as that can damage your RAM, but since I was confident enough with my skills I went straight ahead. Once you have slowly and carefully removed the shielding, place your RAM on the RGB shield without the thermal pad, so you can get an approximation on where the memory modules would sit. After taking note take off the plastic from the thermal pads and place it where you saw the memory modules had rested during the test fit. Pretty much rinse and repeat after that for the other face of the shield.Last thing to note: the kit I received was missing a thermal pad, so I ended up messaging the company to get the thermal pad sent to me, but they sent 1 kit. Got my thermal pad and an extra RGB shield also.